The electric vehicle market is shifting toward smarter, cheaper, and more sustainable maintenance options. In the past, when a single part of an electric car battery failed, mechanics had to replace the entire expensive pack. This wasteful practice cost thousands of dollars and created massive electronic waste. Today, a joint network of European repair cooperatives and automated equipment suppliers is changing the game. Workshops are now deploying autonomous diagnostic tongs to perform precise, module-level EV battery repairs without discarding the whole battery pack.
The Internal Resistance Mismatch Problem
To understand why this technology matters, you must understand how an electric vehicle battery ages. An EV battery pack consists of hundreds of individual cells wired together in groups. As the pack gets older, a single cell block can degrade faster than the others. This faulty block increases the internal resistance of the entire module.
Think of this problem like a clogged pipe in a plumbing system. The single bad cell blocks the smooth flow of energy, which drags down the driving range of the vehicle. Eventually, the vehicle software detects this imbalance and triggers a safety shutdown. Until recently, fixing this issue required a complete pack replacement.
Introducing Autonomous Diagnostic Tongs
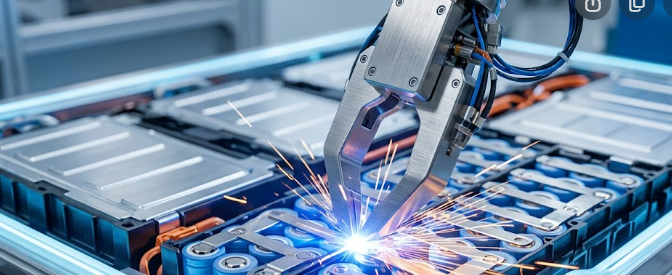
Mechanics do not need to scrap the whole battery anymore because specialized workshop hardware has arrived. Technicians now use autonomous diagnostic tongs to execute precise EV battery repairs at the module level. These smart, automated tools lock directly onto the structural busbars of the battery pack.
The tool uses high-tech sensors to find the exact location of the faulty cell array. Once located, the automated system applies precise thermal or mechanical pressure. This pressure safely severs the laser-welded connections down to a millimeter threshold. Because the machine operates autonomously, human error does not ruin the delicate surrounding components.
Laser Re-Welding and Internal Balancing Specs
[Old Bad Cell Block] —> Extracted by Autonomous Tongs
│
[New Matched Cell Block] ───> Inserted & Laser Re-Welded ───> BMS Voltage Balancing
Once the tongs extract the degraded module, the restoration process begins. Technicians insert a fresh, matched-capacity replacement cell array into the empty slot. Next, advanced compact workshop lasers re-weld the connection tabs with extreme accuracy. This step ensures the new cells have a strong, permanent connection to the battery network.
Finally, the vehicle’s battery management system (BMS) runs an internal balance calibration loop. This software program normalizes the voltage across the entire pack. As a result, the new cell works perfectly with the old cells, restoring the battery to its original specifications.
Slashing Fleet Ownership Overhead
This new method offers massive financial benefits for everyday consumers and commercial fleet owners alike. Localized EV battery repairs cut catastrophic servicing costs by up to 75% compared to full-pack replacements. Instead of spending ten thousand dollars on a new battery, owners only pay for the specific cells they need.
Consequently, this technology directly extends the operational life of older electric vehicles. It makes fleet management predictable and keeps used electric cars on the road much longer. By standardizing this repair process, autonomous tongs are making green transportation truly affordable for everyone.
References
- Society of Automotive Engineers (SAE). (2025). Advanced Battery Remanufacturing Standards for Electric Vehicles.
- International Journal of Automotive Engineering. (2026). Localized Laser Welding Techniques in Lithium-Ion Pack Maintenance.
- Green Fleet Management Review. (2026). Economic Impacts of Module-Level EV Battery Diagnostics.