Homeowners in 2026 are shifting their focus from massive interior overhauls to high-impact exterior upgrades. Recent data from the May 2026 Remodeling Impact Reports reveals a fascinating trend: the Steel Front Door DIY now offers a higher return on investment (ROI) than traditional kitchen renovations. While a gourmet kitchen looks beautiful, it often fails to pay for itself during a home sale. In contrast, upgrading your entryway provides immediate curb appeal and financial gain.
100% Cost Recovery for Your Entryway
If you want to maximize your home’s value, you must look at the “spec” of your front door. Currently, a new steel front door is the only project in 2026 that offers nearly 100% ROI. This means that every dollar you spend on the door and materials comes back to you when you sell the property. Because the installation process is straightforward, many homeowners choose a Steel Front Door DIY approach to save on labor costs.
In previous years, people believed that expensive granite countertops were the best way to attract buyers. However, buyers today prioritize security and energy efficiency. A steel door provides both, making it a “spec” winner in the current real estate market.
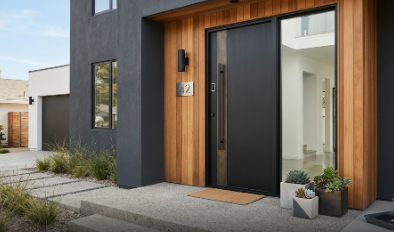
Trending Colors: The Rise of the Black Door
Choosing the right color is vital for your Steel Front Door DIY project to succeed. Industry professionals identify Matte Black and Deep Charcoal as the most popular colors for 2026. These dark, sophisticated tones provide a “High-Tech” appearance that complements almost any siding material, from traditional brick to modern fiber cement.
For example, a matte black door creates a sharp contrast against a white or light gray house. This visual “pop” stops potential buyers in their tracks. By selecting these trending shades, you ensure your home looks modern and well-maintained without spending a fortune on a full exterior paint job.
Smart Hardware and the Steel Front Door DIY
A simple way to boost your “spec” upgrade is by replacing traditional metal handles with decorative biometric hardware. In 2026, DIYers are moving away from standard keys. Instead, they are opting for oversized bronze or leather-wrapped pulls that feature hidden fingerprint scanners.
Integrating technology into your Steel Front Door DIY makes the home feel futuristic and secure. These smart locks allow you to enter your home with a simple touch, which is a major selling point for tech-savvy buyers. This small hardware swap offers a massive perceived value compared to its actual cost.
Kitchen Trends: Refacing vs. Replacing
While the front door wins on ROI, you might still want to refresh your kitchen. The 2026 trend focuses on refacing cabinets rather than replacing them entirely. You can achieve the “2026 look” by using two-tone paints, such as white upper cabinets and wood-tone lowers.
This refacing strategy costs only about 10% of a full kitchen renovation. When you combine a kitchen refresh with a Steel Front Door DIY, you create a cohesive, modern home. You save money while ensuring that the most visible parts of your home look brand new and expensive.
Why Curb Appeal Still Matters
The “ROI King” title belongs to the steel door because it creates the first impression. A buyer decides how they feel about a house within seconds of walking up to the porch. If they see a secure, stylish, and high-tech entrance, they assume the rest of the house is equally well-cared for. Therefore, prioritizing a Steel Front Door DIY is a smarter financial move than tearing out functional kitchen cabinets.
For more information on home value and construction standards, check out the National Association of Realtors website for deep dives into local market trends.
References
- 2026 Remodeling Impact Report: DIY Trends and Cost Recovery.
- Exterior Design Quarterly (May 2026 Edition).
- Smart Home Security & Hardware Trends for Modern Homeowners.


