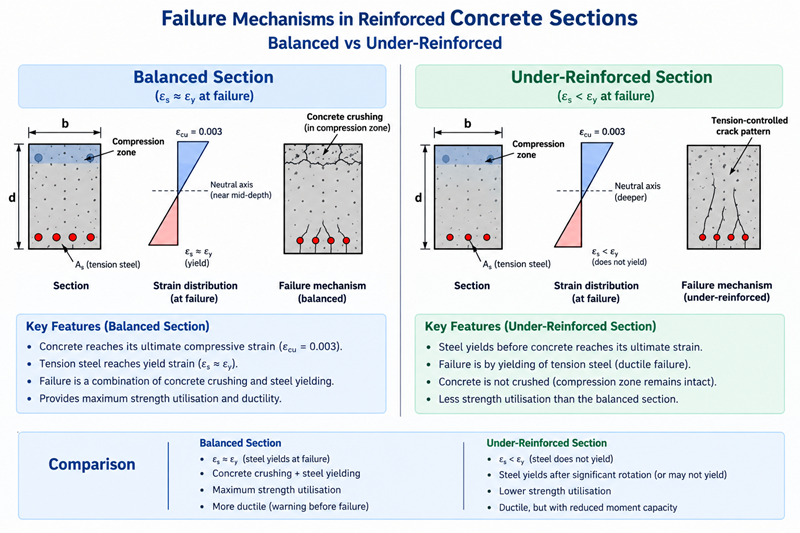
When designing concrete structures, engineers must prioritize safety above everything else. Therefore, you must understand balanced vs under-reinforced sections to create safe, reliable buildings. In civil engineering, concrete can easily crush without warning if we design it poorly. However, we can prevent this catastrophe by carefully balancing the steel reinforcement inside the concrete.
Specifically, this article explores the structural failure mechanisms that govern tension steel yield versus sudden explosive concrete crushing. By applying these concepts, you ensure ductile failure. Consequently, this design approach gives occupants plenty of time to escape during extreme overloads.
What Are Balanced vs Under-Reinforced Sections?
To grasp these concepts, we must first define the reinforcement ratio. The reinforcement ratio simply measures the area of steel compared to the area of concrete. Consequently, we categorize concrete beams into three main types based on this ratio.
First, an under-reinforced section contains less steel than required for a balanced state. In this scenario, the steel yields before the concrete crushes. Second, a balanced section has the exact amount of steel where both steel and concrete fail simultaneously. Finally, an over-reinforced section contains too much steel. This excessive steel causes the concrete to crush explosively before the steel even bends.
Why We Prefer Under-Reinforced Sections
Engineers strongly prefer under-reinforced designs because they provide clear warning signs before failing. For example, if you overload a beam, the steel starts to stretch. As a result, you will notice excessive deflection and wide, visible cracks in the concrete. These gradual warning signs act as an alarm system, saving lives.
Conversely, over-reinforced beams offer absolutely no warning. Because the steel is too strong, the concrete simply shatters violently when overloaded. We call this a brittle, catastrophic compression failure. Naturally, building codes strictly prohibit this unpredictable type of failure to protect public safety.
The Math Behind Balanced vs Under-Reinforced Sections
To guarantee a safe yielding process, we must control the mathematical condition of the beam. Specifically, we keep the actual steel area (As) strictly less than the balanced steel area (As,bal). Furthermore, this approach keeps the neutral axis shallow. The neutral axis represents the invisible line in the beam where the material neither stretches nor compresses.
By maintaining a shallow neutral axis, we guarantee that the steel yields under design ultimate loads. Ultimately, this mathematical rule ensures that the tension steel reaches its yield strain (εs ≥ εy) long before the concrete reaches its crushing strain (εcu = 0.0035).
BS 8110 vs Eurocode 2 in Concrete Design
Modern design standards explicitly ban over-reinforced flexural members in non-prestressed design. However, different codes approach the limits slightly differently. Let us compare BS 8110 and Eurocode 2 regarding balanced vs under-reinforced sections.
BS 8110 limits the neutral axis depth (x) to a maximum of 0.5d, where “d” is the effective depth of the beam. This rule guarantees that the steel yields first. On the other hand, Eurocode 2 is slightly more conservative. Eurocode 2 generally restricts the neutral axis depth to 0.45d for standard concrete classes up to C50/60. Ultimately, both codes achieve the exact same goal: they force the designer to create under-reinforced sections that exhibit ductile failure.
Simple Worked Example using BS 8110
Let us look at a simple example to check if a section is under-reinforced using BS 8110. Suppose we have a beam with an effective depth (d) of 400 mm and a width (b) of 200 mm. The concrete strength (fcu) is 30 N/mm². The applied ultimate moment (M) is 100 kNm (which equals 100 x 10^6 Nmm).
First, we calculate the K factor.
K = M / (b * d² * fcu)
K = (100,000,000) / (200 * 400² * 30)
K = 0.104
Since K (0.104) is less than the BS 8110 limit of 0.156, the section is under-reinforced. Thus, the beam requires no compression steel, and ductile failure is guaranteed.
Simple Worked Example using Eurocode 2
Next, let us analyze the same beam using Eurocode 2 to understand balanced vs under-reinforced sections better. Here, the cylinder concrete strength (fck) is 25 N/mm². The effective depth (d) remains 400 mm, the width (b) is 200 mm, and the design moment (M_Ed) is 100 kNm.
First, we calculate the K factor for Eurocode 2.
K = M_Ed / (b * d² * fck)
K = (100,000,000) / (200 * 400² * 25)
K = 0.125
According to Eurocode 2, the limiting value (K_lim) is typically 0.167 for standard steel yielding. Since our K (0.125) is less than 0.167, the section remains strictly under-reinforced. Consequently, the beam will show clear warning signs before any theoretical failure.
Conclusion on Ductile Failure
In summary, civil engineers must always prioritize safety by choosing appropriate reinforcement ratios. By fully understanding balanced vs under-reinforced sections, you prevent sudden catastrophic collapses in your building projects. Remember, you want your beams to crack and sag under extreme stress, rather than explode without warning. Both BS 8110 and Eurocode 2 provide excellent mathematical limits to keep the neutral axis shallow. Ultimately, following these design guidelines ensures that your structures protect the people inside them. For more detailed insights into structural concrete design and yield behaviors, you can read further on the Concrete Centre website.
References
- British Standards Institution. (1997). BS 8110-1:1997 Structural use of concrete – Part 1: Code of practice for design and construction. BSI.
- European Committee for Standardization. (2004). Eurocode 2: Design of concrete structures – Part 1-1: General rules and rules for buildings (EN 1992-1-1). CEN.
- Mosley, W. H., Bungey, J. H., & Hulse, R. (2007). Reinforced Concrete Design (6th ed.). Palgrave Macmillan.