Guide to Constructing a Reinforced Concrete Slab

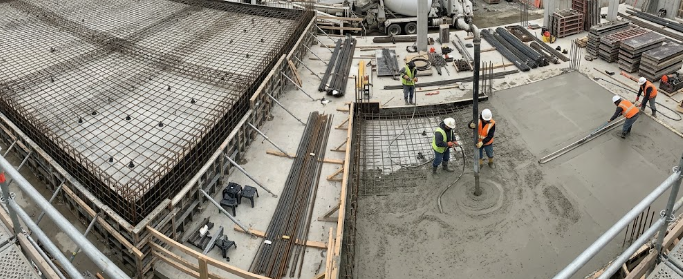
reinforced concrete slab construction in progress

Have you ever wondered how builders create strong floors and roofs? The secret lies in constructing a reinforced concrete slab. A concrete slab is a flat, thick plate that carries heavy loads in buildings. Whether you want to build a house floor or an upper floor, you must understand this process.

In this guide, we will walk you through the simple steps of constructing a reinforced concrete slab. Consequently, you will learn how to prepare your site, fix steel bars, pour concrete, and cure it properly.

Site Preparation for Constructing a Reinforced Concrete Slab

First and foremost, you must prepare the site properly before constructing a reinforced concrete slab. If you are building a ground slab, you need to level the earth. Furthermore, you will lay a hardcore base—usually broken blocks or stones—to provide a solid foundation. Afterward, you must place a damp-proof membrane (DPM). The DPM acts like a plastic shield. It prevents moisture from traveling up from the ground into your dry concrete.

On the other hand, if you want to build a suspended slab (an upper floor), you do not need soil leveling. Instead, you will set up a strong supporting structure using timber or steel props. This temporary support will hold the heavy wet concrete until it dries completely.

Setting Up Formwork When Constructing a Reinforced Concrete Slab

Next, you must build sturdy formwork. Formwork is simply a temporary wooden or steel mold. Builders use it to shape the wet concrete during the process of constructing a reinforced concrete slab. Therefore, you must construct the formwork securely. If you make a weak mold, the heavy wet concrete will break it and spill everywhere.

Additionally, you need to apply mold oil on the inside of the formwork. This oil ensures the wood does not stick to the dry concrete later. Once you finish the mold and double-check all supports, you can move on to placing the steel reinforcement bars.

Fixing Reinforcement for Constructing a Reinforced Concrete Slab

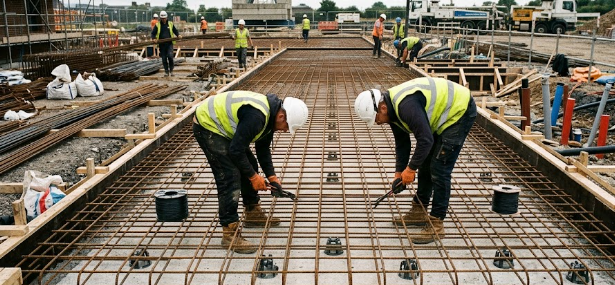
Concrete is very strong when you press it, but it breaks easily when you bend it. Therefore, you must add steel reinforcement bars (rebar). Builders tie these steel bars together to form a grid. This grid acts like the skeleton of your slab, giving it the power to resist bending forces.

Most importantly, you must lift the steel grid slightly off the formwork bottom. Builders use small concrete blocks called spacer blocks to achieve this. The spacer blocks create a gap, ensuring the wet concrete completely surrounds the steel. We call this gap the “concrete cover.” Proper concrete cover protects the steel from rust and fire over the years.

Mixing and Pouring the Concrete

After you approve the steel work, you will start pouring the concrete. First, you must mix the concrete correctly. Many sites use volumetric batching. In this method, workers use headpans to measure cement, sand, and granite accurately. For example, a common mix ratio uses one part cement, two parts sand, and four parts granite.

Moreover, you must strictly control the water-to-cement ratio while constructing a reinforced concrete slab. If you add too much water, the concrete becomes weak. Therefore, only add enough water to make the mixture workable. Once the mix is ready, pour it quickly and spread it evenly across the entire formwork area.

Compacting the Concrete Slab

As you pour the concrete, you will trap air bubbles inside it. These air voids create weak spots in the final structure. Consequently, you must remove these bubbles to ensure maximum structural strength.

To achieve this, you will use a mechanical poker vibrator. You dip the vibrating metal tube into the wet concrete. The fast vibrations shake the mixture and force the trapped air to the surface. However, you must not vibrate the concrete for too long. If you over-vibrate, the heavy granite stones will sink to the bottom, leaving only a weak sandy paste on top.

Curing After Constructing a Reinforced Concrete Slab

Finally, you must cure the concrete. Curing simply means keeping the concrete moist so it gains full strength. Concrete does not dry by evaporation; it hardens through a chemical reaction with water. Therefore, if you let it dry too fast, it will crack and weaken.

You should cure the concrete for 7 to 14 days. You can use several simple methods to do this. For ground slabs, you can build small sand walls around the edges and flood the surface with water, which builders call ponding. Alternatively, you can cover the slab with wet hessian sacks or spray chemical curing compounds to trap the moisture. For more detailed information on advanced curing techniques, you can visit the American Concrete Institute for further reading.

References

  1. Chudley, R., & Greeno, R. (2014). Building Construction Handbook. Routledge.
  2. Mosley, W. H., Bungey, J. H., & Hulse, R. (2007). Reinforced Concrete Design. Palgrave Macmillan.
Slab Formwork: Installation Basics and Safe Striking Times

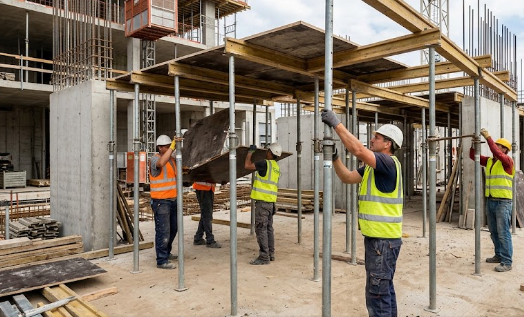
formwork to support  reinforced concrete slab under construction

To begin with, slab formwork acts as a temporary mold that holds wet concrete in its proper shape until it hardens completely. Builders construct this temporary structure using timber, plywood, or steel panels. Consequently, the concrete gains enough internal strength to support its own weight over time. Furthermore, a well-built mold ensures that the final concrete surface looks smooth and level. As a civil engineer, you must understand that installing this mold correctly prevents costly material waste on the construction site. Therefore, workers must secure all panel joints tightly to stop wet concrete from leaking out during the pour.

Essential Support Systems for Slab Formwork

Next, we must look at the specific support systems that hold the slab formwork securely in place. The wet concrete carries a massive amount of weight initially. As a result, engineers use adjustable steel props and strong timber runners to bear this heavy load safely. Workers place these steel props at carefully calculated distances beneath the main wooden or steel decking. In addition, they brace the props to prevent any dangerous side-to-side movement. For example, if a worker bumps into an unbraced prop, the entire structure could easily collapse. Thus, you must always double-check the stability of your temporary supports before you pour any concrete.

Safe Striking Times for Slab Formwork

When can you safely remove the mold? Engineers call this removal process “striking.” According to structural standards like BS 8110 and Eurocode 2, you must follow specific timelines to strike slab formwork safely. First, you can usually remove the vertical side forms of beams quite early, often within 24 to 48 hours. However, the soffit (the bottom part) requires much more curing time. Typically, builders leave the bottom panels in place for 7 to 14 days. Moreover, if the concrete spans a large distance or the ambient weather remains cold, you must leave the supporting steel props in place even longer.

The Dangers of Removing Slab Formwork Too Early

What happens if you rush the striking process? Removing slab formwork too early creates massive safety risks on site. Primarily, the young concrete has not developed enough structural strength to hold its own weight. Consequently, the concrete floor will bend downward, causing excessive deflection. In the worst-case scenario, the entire concrete structure will collapse entirely. Such a catastrophic failure endangers the lives of workers and wastes expensive construction materials. Therefore, you must always rely on standard code guidelines and wait patiently for the concrete to cure properly.

Conclusion and Further Reading

In conclusion, mastering slab formwork installation and striking times guarantees a safe and successful building project. Always use strong support materials, follow codes like BS 8110 strictly, and never rush the removal process. Ultimately, your patience during the curing stage protects your structure from dangerous deflection and collapse. For further reading on standard concrete curing practices and safe formwork removal, you can visit the Concrete Centre’s guide on formwork.

References

  • British Standards Institution. (1997). BS 8110-1:1997 Structural use of concrete – Code of practice for design and construction.
  • European Committee for Standardization. (2004). Eurocode 2: Design of concrete structures.

What size rebar should be used for a residential slab? A Complete Guide

slab reinforcement in progress

If you plan to build a new house, you must make structural decisions early. Many builders and home owners frequently ask: what size rebar should be used for a residential slab? Selecting the right reinforcement ensures your building stands strong for decades. In residential construction, engineers use specific steel bars to handle everyday stresses. You cannot afford to guess these sizes because poor choices often lead to structural failure. In this guide, we will explore standard bar sizes, load differences, and why professional design software matters.

Understanding Loads: What size rebar should be used for a residential slab?

First, we must understand how slabs carry weight. Residential slabs handle much lighter dead and live loads compared to commercial buildings. Dead loads include the weight of the concrete itself, floor tiles, and permanent partition walls. Meanwhile, live loads represent the weight of people, furniture, and moving appliances.

Because homes experience lighter traffic than shopping malls, structural engineers specify smaller reinforcement bars. Consequently, understanding this fundamental load difference directly answers what size rebar should be used for a residential slab. You save money on steel while maintaining perfect structural integrity.

Standard High-Yield Steel Options

When engineers design a standard solid suspended slab for a home, they typically choose 10mm (Y10) and 12mm (Y12) high-yield steel bars. You will use these sizes for both the main and distribution reinforcement. For example, a common design might specify Y12 bars spaced at 200mm center-to-center for the main structural support.

Furthermore, builders often use Y10 bars for distribution to prevent temperature cracks and spread the load evenly. These high-yield steel bars provide excellent tensile strength. As a result, they prevent the concrete slab from bending and cracking under pressure.

Design Standards and Software Calculations

You should never rely on guesswork or rules of thumb when determining what size rebar should be used for a residential slab. Instead, you must derive the actual bar sizes and spacing from proper structural calculations.

Today, civil engineers use advanced structural design software like ProtaStructure or dedicated RCC11 spreadsheets to analyze the exact requirements. These tools follow strict building codes, such as BS 8110 or Eurocode 2, to calculate the precise steel area needed. Therefore, you should always hire a qualified professional to run these calculations for your specific project.

How Slab Thickness Influences Steel Area

Finally, the overall thickness of your suspended slab heavily influences the required steel area. Most residential suspended slabs range from 150mm to 175mm in thickness. A thicker slab offers more stiffness, but it also adds more dead weight to the structure.

As a result, the engineer must balance the concrete thickness with the right reinforcement size. If you increase the slab thickness, you might need to adjust the rebar spacing to meet code requirements. To learn more about standard concrete reinforcement practices and guidelines, you can read further on the American Concrete Institute (ACI) website.

References

  • British Standards Institution. (1997). BS 8110: Structural use of concrete.
  • European Committee for Standardization. (2004). Eurocode 2: Design of concrete structures.

The Ultimate Guide to 16GB Gaming RAM: Why It Is the New Baseline

Choosing computer hardware requires careful planning. Many builders wonder how much memory they actually need for their daily tasks. Today, 16GB gaming RAM has officially become the standard for any modern setup. Without sufficient memory, your computer struggles to run demanding applications smoothly. Therefore, understanding your memory requirements protects your investment and boosts your overall system performance.

Understanding the 8GB Bottleneck

Years ago, 8 gigabytes of memory handled most daily tasks and older games effortlessly. However, modern software demands much more hardware power. When you launch a contemporary AAA video game with an 8GB system, your PC quickly runs out of physical memory.

Consequently, the computer relies on slower storage drives to swap data, which creates severe stuttering and sudden frame rate drops. Additionally, running background apps like Discord or web browsers alongside a game pushes 8GB past its limit. Therefore, gamers experience frustrating lags during crucial gameplay moments.

Why 16GB Gaming RAM Is the Sweet Spot

Fortunately, 16GB gaming RAM solves these performance issues completely. This capacity provides enough headroom for modern video games, streaming software, and background browser tabs simultaneously.

For example, popular titles like Cyberpunk or Hogwarts Legacy require significant memory allocations to render massive open worlds without hitches. Furthermore, multitasking becomes seamless because your operating system never runs out of breathing room. Hardware experts universally recommend this 16GB capacity because it offers the best balance between cost and long-term capability for budget-conscious builders.

Future-Proofing with 32GB (When Is It Necessary?)

While 16GB satisfies most gamers, some users require even higher capacities. If you edit 4K video files, run heavy engineering simulations, or stream high-end games simultaneously, stepping up to 32GB makes complete sense.

Furthermore, heavy multitaskers who keep dozens of browser tabs open while gaming will benefit greatly from this extra capacity. However, casual gamers and standard office users do not need 32GB immediately. Assess your specific daily workflows before spending extra money on memory you might never fully utilize.

Conclusion and Final Hardware Advice

Selecting the right memory capacity dictates how long your computer stays fast and responsive. Upgrading your system ensures you avoid annoying stutters and enjoy smooth framerates across all your favorite titles. Ultimately, choosing 16GB gaming RAM gives you the perfect foundation for modern computing without breaking your budget. For more hardware insights, benchmarks, and tech news, you can check out trusted resources like Tom’s Hardware.

References

  1. PC Gamer. (2025). How Much RAM Do You Need for Gaming? Retrieved from hardware analysis reports.
  2. TechPowerUp. (2026). Memory Scaling Benchmarks in Modern AAA Games.

Decoding Gaming Laptop Battery Life: Why It Drains So Fast

Many users feel surprised when their expensive machines lose power within minutes. Managing gaming laptop battery life often feels like a constant battle against physics. Unlike slim office laptops built strictly for energy efficiency, gaming rigs pack massive amounts of hardware into tight spaces. Consequently, understanding how these components draw power helps you manage your expectations and protect your portable device.

The High-Wattage Hardware Driving Gaming Laptop Battery Life

At the heart of the issue lies raw performance. Manufacturers cram high-voltage components into compact chassis. For instance, a dedicated graphics card demands immense electrical current to render complex 3D worlds smoothly.

Furthermore, heavy-duty cooling fans spin at high speeds to prevent overheating, which consumes additional energy. Add a bright, high-refresh-rate screen into the mix, and you get a massive power drain. Therefore, keeping these high-performance parts running requires far more energy than a standard battery can comfortably supply for long periods.

The Unplugged Trap: Why Gaming Laptop Battery Life Drops Suddenly

Many beginners attempt to play intensive video games while unplugged from a wall socket. Unfortunately, this scenario creates a severe bottleneck. Gaming on battery power drastically drains the cell in under an hour because the system cannot pull enough current from chemical storage alone.

To prevent sudden shutdowns and component damage, the computer automatically triggers heavy performance throttling. As a result, frame rates plummet, and your game stutters badly. Playing demanding games without a charger completely defeats the primary purpose of having a high-end mobile rig.

Practical Optimization Tips to Extend Gaming Laptop Battery Life

Fortunately, you can take active steps to preserve power when you are away from an outlet. First, switch your system from dedicated graphics to integrated graphics for light web browsing or document editing. Integrated chips consume a fraction of the power.

Additionally, lower your screen brightness and reduce the display refresh rate from high settings down to 60Hz. Finally, close background apps like Discord or gaming launchers that secretly keep your hardware awake. These simple adjustments dramatically improve your mobile runtime.

Mastering your device settings ensures you get the best of both worlds: extreme performance at your desk and reliable portability on the go. By understanding your hardware demands, you can easily avoid unexpected shutdowns during important tasks. For more in-depth hardware guides and battery optimization strategies, you can explore detailed reports on Tom’s Hardware.

References

  1. XMG Help Center. (2025). Short Battery Life in Gaming Laptops: Troubleshooting Guide.
  2. EveZone. (2026). Battery Life Leaders Among Gaming Laptops and Power Management.

 CPU vs GPU for Gaming: Where Should You Spend Your Budget?

CPU vs GPU for Gaming: Where Should You Spend Your Budget?

Building a custom computer requires careful financial planning, especially when evaluating CPU vs GPU for gaming performance. Many first-time builders feel confused about where to invest their hard-earned money. If you allocate your funds incorrectly, your system will experience performance bottlenecks. Therefore, understanding the distinct roles of each component helps you make smart purchasing decisions and protects your hardware budget.

The GPU’s Core Role in CPU vs GPU for Gaming

The graphics card acts as the single most important component for your gaming rig. When analyzing CPU vs GPU for gaming, you must remember that the graphics processor dictates your visual quality, resolution, and frame rates. For instance, if you want to play modern titles at crisp 1440p or stunning 4K resolutions, your graphics card handles nearly all the heavy rendering work. Without a robust graphics card, your favorite games will suffer from severe stuttering and low frame rates, regardless of how fast your other components operate.

The Common Beginner Mistake

Unfortunately, many beginners make costly errors during component selection. They often spend extra money on an ultra-powerful processor while skimping on the graphics card. This imbalance creates a severe hardware mismatch. Your expensive processor will sit idle because it finishes its tasks instantly and waits for the slower graphics card to catch up. Consequently, you waste valuable funds on processing power you cannot actually utilize during gameplay. Always prioritize visual hardware if your primary goal is high-end entertainment.

Finding the Smart Balance for CPU vs GPU for Gaming

Achieving optimal system performance requires a sensible approach. Hardware experts recommend pairing a solid mid-range processor with the strongest CPU vs GPU for gaming pairing your wallet can support. For example, combining a reliable six-core processor with a high-performance graphics card delivers incredible value. This balanced strategy prevents bottlenecks and ensures your computer runs smoothly for years.

Ultimately, balancing your hardware investment guarantees you enjoy stutter-free gaming without overspending. By targeting the right components, you maximize your financial value. For additional hardware benchmarks and comprehensive component analysis, you can read the latest guides on Tom’s Hardware.

References

  1. Tom’s Hardware. (2026). GPU Hierarchy and Gaming Performance Benchmarks.
  2. Corsair. (2026). CPU vs GPU: Which is More Important for Gaming? Retrieved from hardware expert resources.