Summary of Key Points
- Upgrading older vehicles with modern technology enhances safety and driving comfort.
- GPS-based HUD units work on all vehicles, while OBD-II units work best on post-1996 models.
- Installation requires minimal tools: a display kit, glass cleaner, cable management clips, and a trim tool.
- Tucking wires behind dashboard trim creates a clean, factory-installed look.
- Applying a reflective film onto the windshield eliminates double images and ghosting.
Introduction to Head Up Display Upgrades
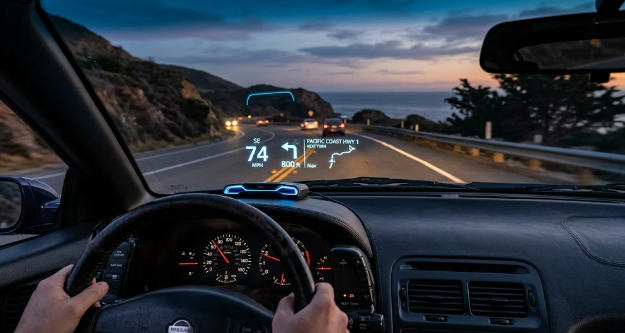
Many drivers wonder how to install a head up display HUD on older cars without spending a fortune at a repair shop. Fortunately, modern aftermarket electronics make this upgrade fast and straightforward. A head up display projects key driving information, such as vehicle speed and navigation hints, directly onto your windshield. Therefore, you can keep your eyes on the road instead of constantly checking instrument panels down on the dashboard. This guide walks you through every step to choose, mount, and wire a display in your vehicle.
Choosing the Right HUD Type for Your Vehicle
Before buying hardware, you must select the technology that matches your car. Modern manufacturers offer two main categories of aftermarket display units: OBD-II models and GPS models.
OBD-II Head Up Displays
OBD-II displays plug directly into the On-Board Diagnostics port of your vehicle. Consequently, these units read real-time data straight from your car engine computer. They display RPM, engine temperature, voltage, and exact speed. However, standard OBD-II ports only exist on vehicles built after 1996 in North America. If your car was manufactured before 1996, an OBD-II display will not function.
GPS and Solar Head Up Displays
GPS displays calculate your driving speed using satellite signals. As a result, they work on literally any car, truck, or vintage automobile regardless of age. You simply plug the unit into a 12V cigarette lighter socket or a USB power port. Furthermore, some modern GPS units include built-in solar panels, which reduces the need for constant charging cables.
Tools and Materials Required
You do not need specialized mechanic tools for this DIY job. Instead, gather these simple items before beginning the installation:
- Aftermarket HUD unit (GPS or OBD-II compatible)
- Non-slip dashboard pad or double-sided adhesive strip
- Reflective windshield film (usually included in the kit)
- Plastic trim removal tool
- Microfiber cloth and glass cleaner
- Adhesive cable routing clips
Step-by-Step Guide: How to Install a Head Up Display HUD on Older Cars
Follow these quick steps to mount and wire your display unit successfully in under 30 minutes.
Step 1: Clean the Dash and Windshield Area
First, spray glass cleaner on a microfiber cloth and thoroughly wipe the lower driver-side corner of the windshield. Next, clean the upper surface of the dashboard where the display will rest. Dust and oil prevent adhesive pads and reflective film from sticking properly.
Step 2: Position the Display Unit
Place the non-slip mounting pad on the dashboard near the steering wheel column. Next, position your HUD unit onto the pad. Sit in the driver seat and adjust the placement until the projected screen aligns naturally with your line of sight. Make sure the unit does not block your view of the road ahead.
Step 3: Route the Power Cable
For a clean setup, hide the power cable inside your vehicle dashboard trim. Use a plastic trim removal tool to gently pry open the rubber weatherstripping around your driver door frame. Push the power cable along the dashboard edge, down the pillar, and underneath the dash panel. Secure loose wiring with adhesive clips so cables stay out of the way of your feet and pedals.
Step 4: Connect the Power Source
If you use an OBD-II display, locate the diagnostic port beneath your steering wheel and push the connector firmly into place. Conversely, if you use a GPS unit, plug the power adapter into your 12V accessory outlet or USB port. Turn on your vehicle ignition to verify that the screen powers on instantly.
Step 5: Apply the Reflective Windshield Film
Standard windshield glass can create a double image or “ghosting” effect because glass contains multiple layers. To fix this issue, spray a light mist of water onto the inside surface of the windshield directly where the projector beam hits. Peel the protective backing off the reflective film and press it onto the damp glass. Use a credit card or squeegee to slide out air bubbles and excess water. Finally, wipe the glass dry and turn on the projector to test clarity.
Fine-Tuning and Calibrating Your Display
Once you complete the mechanical setup, spend a few minutes tuning the device settings. Most modern HUD units allow you to calibrate speed readout accuracy. Compare the HUD speed reading against a smartphone GPS app during a test drive. If the speed differs slightly, enter the device menu to adjust the speed multiplier setting. Additionally, set automatic brightness controls so the projection dims comfortably during night driving.
Conclusion
Now that you know how to install a head up display HUD on older cars, you can enjoy high-tech driving convenience in any classic ride. This affordable weekend project enhances overall safety while giving your cabin a slick modern feel. For more technical tips on maintaining classic vehicle electronics, explore detailed auto guides on Car and Driver.
References
1. Society of Automotive Engineers (SAE). Vehicle Electronics and Display Interface Standards.
2. Federal Highway Administration (FHWA). Visual Ergonomics and Head-Up Display Integration in Passenger Vehicles.
3. National Highway Traffic Safety Administration (NHTSA). Impact of Driver Information Displays on Road Attention.