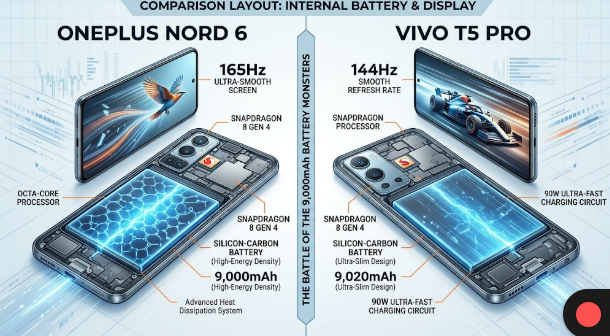
Storing Sensitive Information: Internal vs. External Phone Memory

 A smartphone with a padlock icon, illustrating the security of storing sensitive information on a phone's internal memory or an external SD card.

When you think about storing sensitive information like personal photos, financial documents, or passwords on your phone, you probably wonder where the safest place is to keep them. Should you use your phone’s built-in memory or an external storage card like an SD card? The answer is not as simple as it seems, as both options have different security features you need to understand.

The Security of Internal Memory

Internal memory is the non-removable storage built into your phone. It’s where your operating system, apps, and most of your personal data are stored by default. A major advantage of internal storage is its close integration with the phone’s security features. On modern smartphones, the internal memory is almost always encrypted by default. This means that all the data on the device is scrambled and can only be accessed with your passcode, PIN, or biometric security like a fingerprint or face ID.

If someone steals your phone, they won’t be able to access your sensitive data without unlocking the device. Even if they try to remove the storage chip to read it on another computer, the data will still be encrypted and unreadable. The security of storing sensitive information on internal memory is strong because it’s directly tied to the phone’s built-in security.

The Risks of External Storage (SD Cards)

External storage, like an SD card, offers a convenient way to expand your phone’s storage. However, when it comes to security, it has some significant drawbacks. The biggest risk is that an SD card is a physical, removable device. If your phone is lost or stolen, someone can simply eject the SD card and access its contents on any other device without needing your phone’s password.

Unlike internal memory, SD cards aren’t always encrypted by default. This means any file you save on it could be easily read by anyone. While some phones allow you to encrypt an SD card, this process can be complicated and often makes the card unusable in other devices. If the encryption key is tied to the phone’s internal memory and the phone gets damaged, you may lose access to your data on the SD card.

The Verdict: Which is Safer?

For storing sensitive information, internal memory is the clear winner. Its built-in encryption and tight integration with the phone’s security systems make it a far more secure option. Storing data on an external SD card, while useful for non-sensitive files like photos and videos you don’t mind others seeing, poses a high risk to your privacy. A thief or anyone who finds your phone can easily steal the card and all the data on it.

To keep your sensitive data safe, you should always rely on your phone’s internal storage. Always activate your phone’s lock screen with a strong passcode or biometric security. You should also ensure that the phone’s disk encryption is enabled, which is the standard on most new smartphones. To learn more about data security and encryption, you can read this article on CISA’s website.

References

A Modern Comeback: The BlackBerry Curve 9300 is Back

A rendered image of the new BlackBerry Curve 9300, a smartphone combining a classic physical keyboard with a modern Android 14 operating system.

The smartphone world keeps surprising us with unexpected returns. The latest news has truly made an impact: the famous BlackBerry Curve 9300, a phone that once defined professional communication, is making an amazing return. This new version runs on Google’s latest Android 14 operating system. It brings together the best of both worlds: the beloved physical keyboard and the modern features of Android.

This new device targets people who miss the real, satisfying clicky feel of a physical keyboard that touchscreen phones just cannot match. While it keeps the classic Curve design, it also adds up-to-date features. This makes it a serious competitor in today’s market, especially for users focused on productivity.

Why Bring Back the BlackBerry Curve 9300?

BlackBerry phones hold a special place in history, especially for business people. They highly valued the strong security features and efficient communication tools these phones offered. The Curve series quickly became a symbol of mobile productivity before the full touchscreen revolution changed everything.

The decision to bring back the BlackBerry Curve 9300 with Android 14 is a smart move. It aims to capture both people who are feeling nostalgic and new users looking for a different kind of mobile experience. Furthermore, this revival addresses a gap in the current smartphone market.

Blending Classic Design with Modern Technology

This unique approach allows you to enjoy the fast, accurate typing of a physical QWERTY keyboard. At the same time, you have full access to the millions of apps and new features that Android 14 offers. You no longer have to choose between a physical keyboard and a modern operating system.

Market research shows a growing interest in phones with physical keyboards. This is particularly true for individuals who write many emails or documents on their mobile devices. The physical keys provide a typing accuracy and a tactile feel that virtual keyboards simply cannot match. Therefore, the new BlackBerry Curve 9300 is very appealing for anyone focused on speed and productivity.

Android 14 Powers the Classic Feel

Running on Android 14 means that this new device benefits from the latest security improvements and performance boosts from Google. Users will find a familiar interface for managing their apps, notifications, and settings. This integration is smooth, allowing the physical keyboard to work seamlessly with all Android applications, including popular messaging and professional tools.For further reading on the history and evolution of the original BlackBerry devices, you can visit the BlackBerry official site

`

The Perfect Plate: A Guide to Simple Rice and Stew

A beautifully plated dish of fluffy white Rice and Stew with chicken pieces

Many people consider Rice and Stew a classic and comforting meal. It is a simple dish where fluffy white rice becomes the perfect partner for a hearty and flavorful stew. This versatile meal is popular in many parts of the world, and you can easily adapt it to your taste. You just need to understand the main components and how to prepare them.

What You Need for Rice and Stew

The two main parts of this dish are the rice and the stew.

  1. The Rice: You typically use plain white rice. Many people prefer parboiled rice because it cooks up fluffy and separate, which means it doesn’t stick together. You simply boil the rice in water until it is soft and cooked through.
  2. The Stew: This is the heart of the dish. A typical stew for this meal is tomato-based. You will need a blend of fresh tomatoes, peppers, onions, and garlic. After blending, you fry this mixture until the oil comes to the top. This important step helps to remove the sour taste of the tomatoes and creates a rich, deep flavor.

Adding Your Protein

The stew is not complete without a protein. You can use various meats or fish, depending on your preference. Popular choices include:

  • Chicken: You can boil or fry chicken pieces before adding them to the stew.
  • Beef: Pieces of beef, often cut into cubes, are great for a rich, meaty stew.
  • Fish: Fried fish adds a delicious and different flavor.

No matter which protein you choose, you should season it well before adding it to the stew. This ensures the flavor runs through the entire dish.

How You Serve Rice and Stew

After you have cooked the rice and the stew separately, you can serve them together. You place a portion of the hot, fluffy rice on a plate and spoon a generous amount of the rich, savory stew over it. Sometimes, people mix the stew into the rice, and other times, they eat them separately on the same plate. The final result is a satisfying and delicious meal that a whole family can enjoy.

For a deeper look into the history and cultural significance of this beloved combination, you can read more here.

References

From Flower to Chocolate: A Guide to Pollination and Pod Production for Home Cocoa Growers

A cocoa flower and a paintbrush, representing cocoa pollination and pod production.

The journey from a delicate flower to a delicious chocolate bar is an incredible one, especially when you are growing cocoa at home. This process begins with a fascinating and often overlooked step: pollination. Understanding the unique life cycle of the cocoa plant and how it produces pods is essential for any home grower who wants to succeed in harvesting their own beans.

Understanding Cocoa Flowers

Cocoa flowers are small, beautiful, and a bit unusual. They grow directly from the trunk and older branches of the cocoa tree, a phenomenon known as cauliflory. Each flower is only about a centimeter wide, with five delicate petals. Because of their size and location, these flowers are often missed by home growers. They are also unique in that they are short-lived, typically opening at night and lasting for only a day. The flowers are not fragrant and do not attract large pollinators like bees, which presents a challenge for successful cocoa pollination and pod production.

The Role of Midges

In their native environment, cocoa flowers are pollinated by tiny biting midges from the Forcipomyia genus. These insects are small enough to crawl into the tiny, complex structure of the flower and transfer pollen. However, these specific midges are not found in most parts of the world where people are trying to grow cocoa at home. This means that for a home grower, successful pollination is highly unlikely to happen naturally. To get a harvest, you will likely need to take matters into your own hands and perform manual pollination.

Manual Pollination Techniques

Manual pollination is a simple but precise task. You will need a small, soft-bristled paintbrush or even a toothpick. The best time to perform this is in the morning, right after the flowers have opened. Here is how you do it:

  1. Identify a donor flower: Find a newly opened flower on your cocoa tree. Gently use your paintbrush or toothpick to collect pollen from the center of the flower. You will see a small amount of yellow powder.
  2. Find a recipient flower: Locate another newly opened flower.
  3. Transfer the pollen: Carefully transfer the collected pollen to the stigma (the female part) of the recipient flower. The stigma is often a sticky, bulbous part in the center. A light touch is all that is needed.

This process significantly increases your chances of successful cocoa pollination and pod production.

Pod Development and Maturation

After successful pollination, you will see a tiny fruit begin to form where the flower was. This tiny fruit will gradually grow into a pod. A cocoa pod is ready to harvest when it has changed from green to a deep yellow, orange, or red, and feels firm to the touch. This process usually takes about five to seven months. To protect these developing pods from pests, like squirrels or birds, consider using a fine mesh bag to cover them once they start to grow. This simple step can help you ensure you get to enjoy the fruits of your labor.

For further reading on cocoa farming and the science of cocoa, you can visit the International Cocoa Organization (ICCO).

References

Foamy Urine Causes: Separating Fact from Fiction

A clear, close-up photo of a glass filled with a light-colored liquid, possibly urine, showing a thick layer of white foam on the surface. The foam is prominent and distinct, indicating a potential medical condition.

You go to the bathroom and notice your urine is foamy. A common misconception is that this is a sure sign of kidney disease. While foamy urine can sometimes indicate a kidney problem, it is not always the case. Many other, more common factors can cause your urine to appear bubbly or frothy. Understanding these other foamy urine causes can help you avoid unnecessary worry.

In this article, we will explain some of the other reasons why you might see foam in your urine and when you should actually be concerned.

Why Does Your Urine Get Foamy?

Foam is created when air gets trapped in a liquid. This can happen to your urine for a number of reasons, and many of them have nothing to do with your health.

1. Urination Speed and Force

A very simple and common reason for foam is the speed at which you urinate. If your bladder is full, your urine stream can be fast and forceful. This powerful stream hits the toilet water, stirring it up and creating temporary bubbles or foam, similar to pouring a liquid from a height into a glass. This type of foam usually disappears quickly, within a few minutes.

2. Cleaning Products in the Toilet

Sometimes, the foam you see is not from your urine at all. Residual cleaning chemicals or soaps left in the toilet bowl can react with your urine. This creates a soapy froth that can be easily mistaken for a medical issue. To check if this is the case, try urinating into a clean container and see if foam appears.

3. Dehydration

When you don’t drink enough water, your urine becomes more concentrated. It contains a higher ratio of waste products and proteins to water. This concentrated urine has a thicker consistency and can be darker in color. When it hits the toilet water, it is more likely to form a head of foam. Increasing your water intake is a simple solution if dehydration is one of your foamy urine causes.

4. The Presence of Protein in Urine (Proteinuria)

This is the main cause that is sometimes linked to kidney disease. Healthy kidneys work as filters, keeping important proteins like albumin in your blood. However, when your kidneys are damaged, they may allow protein to leak into your urine. This condition is called proteinuria. The protein acts like a surfactant (similar to soap), reducing the surface tension of the urine and making it foamy.

5. Other Health Conditions

While not as common, some other health conditions can also contribute to foamy urine. For example:

  • Diabetes: High blood sugar levels can damage the kidneys over time, leading to protein leakage.
  • Urinary Tract Infections (UTIs): A UTI can cause inflammation, which may lead to a temporary increase of protein in the urine.
  • Retrograde Ejaculation: In men, this condition causes semen to enter the bladder instead of being released, which can make the urine foamy.

When to See a Doctor

Seeing foam in your urine occasionally is usually not a cause for concern. However, you should see a doctor if:

  • The foamy urine is persistent and happens often.
  • The foam becomes more noticeable over time.
  • You have other symptoms, such as swelling in your hands, feet, face, or abdomen.
  • You also have other symptoms like fatigue, loss of appetite, or nausea.

A simple urine test can determine if you have a significant amount of protein in your urine. This can help your doctor find the actual foamy urine causes and recommend the right course of action.

References

 Using Detergent and Water to Deal With Black Pod Rot in Cocoa Trees


A close-up shot of a cacao pod on a tree, showing signs of severe black pod rot disease. The pod, which is yellow and green, is covered in several dark, sunken lesions. In the background, a hand is holding a white spray bottle, applying a liquid to the pod, likely a fungicide or treatment. The focus is on the diseased fruit and the attempt to treat it.

Have you ever wondered what makes that delicious chocolate bar you love? It all starts with the cocoa tree. This amazing plant gives us cocoa pods, which contain the beans that are turned into cocoa powder and chocolate. But, like all plants, the cocoa tree faces threats, and one of the most serious is a disease called black pod rot.

Black pod rot is a fungal disease that can destroy cocoa pods. It starts as a small, dark spot and quickly spreads, turning the entire pod black and rotten. This can cause huge losses for farmers and affect the supply of cocoa worldwide.

Using a Simple Solution for a Big Problem: Detergent and Water

While there are many chemical fungicides available to fight black pod rot, they can be expensive and sometimes harmful to the environment. That’s why many farmers are exploring a simpler, more eco-friendly solution: a mixture of detergent and water. This method is gaining popularity because it’s cheap, easy to prepare, and effective.

The idea behind this approach is simple. The detergent helps to break down the waxy layer on the surface of the fungus, exposing it to the water. The water then helps to wash away the fungus and its spores, preventing them from spreading to other pods. The detergent also acts as a mild disinfectant, killing the fungus on contact.

How to Prepare and Apply the Mixture

To use this method, you need a few simple things:

  1. Detergent: A regular household liquid detergent will do the trick. You don’t need a special kind.
  2. Water: Clean, fresh water is best.
  3. A sprayer: A backpack sprayer or a handheld sprayer is perfect for applying the mixture.

Here’s how you prepare the solution:

  • Mix the solution: The general rule is to mix about 2 tablespoons of liquid detergent with 1 gallon (about 3.8 liters) of water. You can adjust the ratio depending on the size of your sprayer.
  • Stir well: Make sure the detergent is completely mixed with the water. You should see a light, soapy solution.
  • Apply the mixture: Spray the mixture directly onto the infected pods. Make sure you cover the entire pod, especially the areas with the black spots. You should also spray the healthy pods nearby to prevent the disease from spreading.
  • Repeat the process: For the best results, you need to apply the solution regularly, especially during the rainy season when the disease is most active. A good schedule is to spray once every 10 to 14 days.

This method, though simple, has been found to be an effective way to control and prevent the spread of black pod rot in cocoa farms. It’s a great example of how simple, everyday items can be used to solve complex agricultural problems. It’s an affordable and sustainable way to protect the cocoa trees that give us the chocolate we love.

References

  • “Black Pod Rot of Cocoa” by the Food and Agriculture Organization of the United Nations (FAO)
  • “Control of Cocoa Black Pod Disease” a research paper by Adeyemi, O. A.

“The Use of Household Detergent for the Control of Phytophthora pod rot of Cocoa” a study from the Cocoa Research Institute of Nigeria (CRIN)