The journey from a delicate flower to a delicious chocolate bar is an incredible one, especially when you are growing cocoa at home. This process begins with a fascinating and often overlooked step: pollination. Understanding the unique life cycle of the cocoa plant and how it produces pods is essential for any home grower who wants to succeed in harvesting their own beans.
Understanding Cocoa Flowers
Cocoa flowers are small, beautiful, and a bit unusual. They grow directly from the trunk and older branches of the cocoa tree, a phenomenon known as cauliflory. Each flower is only about a centimeter wide, with five delicate petals. Because of their size and location, these flowers are often missed by home growers. They are also unique in that they are short-lived, typically opening at night and lasting for only a day. The flowers are not fragrant and do not attract large pollinators like bees, which presents a challenge for successful cocoa pollination and pod production.
The Role of Midges
In their native environment, cocoa flowers are pollinated by tiny biting midges from the Forcipomyia genus. These insects are small enough to crawl into the tiny, complex structure of the flower and transfer pollen. However, these specific midges are not found in most parts of the world where people are trying to grow cocoa at home. This means that for a home grower, successful pollination is highly unlikely to happen naturally. To get a harvest, you will likely need to take matters into your own hands and perform manual pollination.
Manual Pollination Techniques
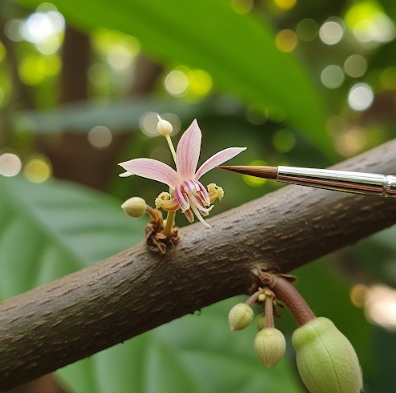
Manual pollination is a simple but precise task. You will need a small, soft-bristled paintbrush or even a toothpick. The best time to perform this is in the morning, right after the flowers have opened. Here is how you do it:
- Identify a donor flower: Find a newly opened flower on your cocoa tree. Gently use your paintbrush or toothpick to collect pollen from the center of the flower. You will see a small amount of yellow powder.
- Find a recipient flower: Locate another newly opened flower.
- Transfer the pollen: Carefully transfer the collected pollen to the stigma (the female part) of the recipient flower. The stigma is often a sticky, bulbous part in the center. A light touch is all that is needed.
This process significantly increases your chances of successful cocoa pollination and pod production.
Pod Development and Maturation
After successful pollination, you will see a tiny fruit begin to form where the flower was. This tiny fruit will gradually grow into a pod. A cocoa pod is ready to harvest when it has changed from green to a deep yellow, orange, or red, and feels firm to the touch. This process usually takes about five to seven months. To protect these developing pods from pests, like squirrels or birds, consider using a fine mesh bag to cover them once they start to grow. This simple step can help you ensure you get to enjoy the fruits of your labor.
For further reading on cocoa farming and the science of cocoa, you can visit the International Cocoa Organization (ICCO).
References
- International Cocoa Organization. “About Cocoa.” Available at: https://www.icco.org/about-cocoa/
- Wood, G. A. R., & Lass, R. A. (1985). Cocoa. Longman Scientific & Technical.
- Theobroma Cacao. (2024). In Wikipedia. Retrieved August 12, 2025, from https://en.wikipedia.org/wiki/Theobroma_cacao