Summary of Key Points
- Upgrading memory and storage extends the lifespan and speed of your HP Laptop 15.
- Required tools include a Phillips #00 screwdriver, a plastic prying tool, and an anti-static wrist strap.
- Always power off the laptop and disconnect the internal battery before touching components.
- Insert RAM at a 45-degree angle and press down until clips lock in place.
- Swap or add the M.2 NVMe SSD by removing the single securing screw and sliding the drive into place.
- Verify new hardware detection in BIOS and Windows Task Manager after reassembly.
Introduction
Is your budget computer struggling to keep up with modern apps? Learning How to upgrade RAM and NVMe SSD on HP Laptop 15 can give your computer a massive performance boost without spending money on a brand-new device. Increasing system RAM allows you to run multiple applications smoothly, while a faster M.2 NVMe solid-state drive expands your storage and slashes boot times.
In this comprehensive guide, we will walk you through the entire installation process step by step. Furthermore, we will highlight important safety precautions to protect your computer components from electrical damage. Consequently, even beginners can perform this hardware upgrade with confidence.
Tools and Equipment Needed
Before you begin the upgrade process, gather all necessary tools on a clean, well-lit workbench. Having the proper equipment prevents accidental damage to fragile laptop plastic clips and delicate circuit boards.
- Phillips #00 precision screwdriver
- Plastic spudger or guitar pick opening tool
- Anti-static wrist strap (recommended)
- Compatible DDR4 or DDR5 SODIMM RAM module
- Compatible M.2 NVMe PCIe SSD
Step 1: Safety and Preparation
Safety comes first when working with sensitive electronic hardware. Therefore, shut down your laptop completely through the operating system rather than putting it to sleep. Disconnect the power adapter and all external USB devices.
Next, place the laptop upside down on a soft, scratch-free surface. Ground yourself using an anti-static strap or by touching a grounded metal object. This action prevents static electricity from shocking sensitive microchips.
Step 2: Removing the Bottom Cover
To access the internal components, you must remove the bottom chassis cover. Locate all visible screws on the bottom shell using your screwdriver. However, keep in mind that HP frequently hides additional screws underneath the rubber anti-slip strips on the base.
Carefully peel back the rubber feet if your specific model conceals screws beneath them. Place all removed screws in a small tray so you do not lose them. Afterwards, slide your plastic spudger into the seam between the top keyboard deck and bottom case. Gently pry around the edges until all plastic clips snap open, then lift the cover off.
Step 3: How to Upgrade RAM on HP Laptop 15
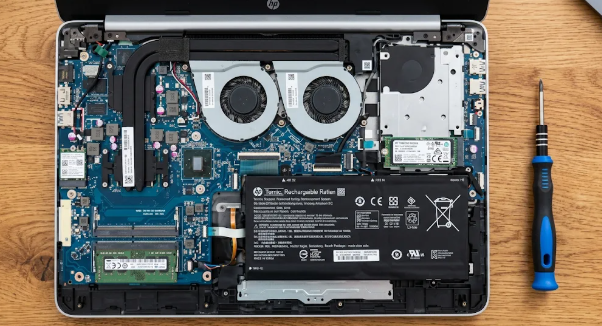
Once you open the casing, immediately disconnect the internal battery cable from the motherboard. This step prevents electrical short circuits while handling internal parts. Next, locate the memory SODIMM slots near the center of the motherboard.
Removing Old RAM (Optional)
If you are replacing an existing memory module, push the metal retaining clips on both sides of the RAM slot outward. The memory stick will pop up at an angle automatically. Carefully pull the module out of the slot by holding its edges.
Installing New RAM
Align the notch on your new RAM stick with the ridge inside the motherboard memory slot. Insert the RAM stick firmly into the slot at a 45-degree angle. Finally, press down on the top edge of the module until the side metal clips snap securely into place.
Step 4: How to Upgrade NVMe SSD on HP Laptop 15
Locate the M.2 NVMe SSD slot on the motherboard. In most HP Laptop 15 models, the drive sits near the battery or storage bay. It is secured by a single Phillips head screw at the rear of the board.
Unscrew the mounting screw and set it aside. The old SSD will rise slightly. Gently pull the drive straight out of the M.2 connector slot. Next, take your new NVMe SSD and align its key notch with the slot connector. Slide the new SSD firmly into the slot at a slight angle, push it flat against the standoff post, and tighten the retaining screw to lock it in place.
Step 5: Reassembly and First Boot Verification
After installing both components, carefully reconnect the internal battery connector to the motherboard. Next, align the bottom chassis cover with the laptop edges and press down firmly around the perimeter until all plastic clips lock. Reinstall all base screws securely.
Plug in your AC power adapter and turn on your laptop. Press the F10 key repeatedly during startup to enter the BIOS Setup Utility. Check the system summary page to confirm that the laptop recognizes both the new RAM capacity and the NVMe drive. Once verified, save settings and exit to boot into Windows normally.
By completing these steps, you successfully complete the process on How to upgrade RAM and NVMe SSD on HP Laptop 15. For hardware compatibility lists and model specifications, check the official HP Support website.
References
HP Support. Manuals and Hardware Maintenance Guides for HP 15 Laptop PC series. Available at: https://support.hp.com
Crucial System Scanner and Memory Upgrade Advisor Guide. Available at: https://www.crucial.com