IP Geolocation & Privacy: Where Am I Right Now Explained Simply

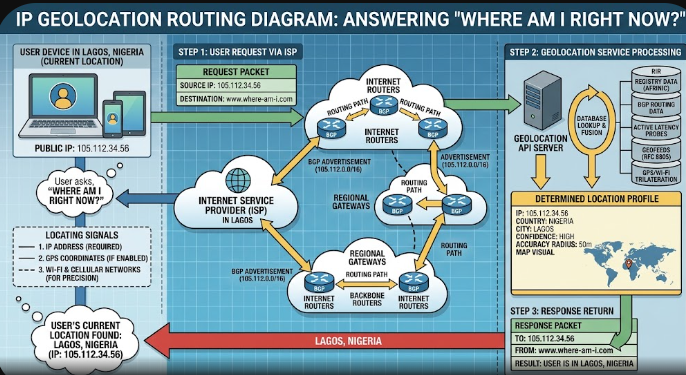
 IP geolocation routing diagram showing network nodes answering where am I right now?

Have you ever opened a navigation application or search engine and asked, “Where am I right now?” Within seconds, your smartphone or computer pinpointed your exact position on a digital map. Everyday users often find this instant accuracy surprising and magical.

However, modern connected hardware relies on complex background networks rather than simple magic. Devices continuously read surrounding signals, network addresses, and satellite data to pinpoint your location. Understanding these positioning methods helps you protect your digital footprint while enjoying modern location services.

+———————————————————————–+
|                       LOCATION DETECTION METHODS                      |
+———————————————————————–+
  |                   |                        |                      |
  v                   v                        v                      v
+————+  +——————–+  +——————+  +———–+
| IP Address |  | Cell Tower Triang. |  | Wi-Fi BSSID Maps |  |    GPS    |
| (City/State|  | (100m – 1km range) |  | (Room precision) |  | Satellites|
| Precision) |  |                    |  |                  |  | (3m-5m)   |
+————+  +——————–+  +——————+  +———–+

How IP Geolocation Works to Answer Where Am I Right Now?

Every device on the internet receives a unique string of numbers called an Internet Protocol (IP) address. Your Internet Service Provider (ISP) assigns this address whenever your home router or mobile phone connects to the network. IP geolocation databases match these network addresses against registered physical server locations worldwide.

Consequently, website servers read your incoming request address to estimate your general area instantly. This method usually identifies your country, state, or city correctly. However, IP address lookup rarely reveals your exact street address or home building. Therefore, websites rely on IP data primarily for showing regional content, localized pricing, and initial language settings.

Precise Tracking Methods: GPS, Wi-Fi Mapping, and Cellular Towers

When applications require high accuracy, your smartphone uses Global Positioning System (GPS) chips. GPS receivers process radio signals from orbiting satellites to calculate latitude and longitude coordinates. This satellite tracking system provides high pinpoint accuracy within a few meters outdoors. However, thick concrete walls and dense roofs frequently block these satellite signals indoors.

To maintain positioning accuracy inside buildings, mobile systems use Wi-Fi mapping and cellular tower triangulation. Devices continuously scan nearby Wi-Fi router signatures (BSSIDs) and cell tower signal strengths. Specialized location databases map these surrounding signals against known geographical locations. By combining these three systems simultaneously, your phone maintains smooth location tracking everywhere.

Browser Permissions and Data Anonymization

Web browsers act as strict gatekeepers between websites and your location hardware. When a web application asks, “Where am I right now?”, the browser displays an explicit permission prompt first. Websites cannot read your precise device coordinates without your direct consent.

Furthermore, responsible application developers anonymize collected location data to safeguard user identities. Modern mobile operating systems mask exact coordinates by truncating precise latitude and longitude values. As a result, advertising companies analyze regional traffic trends without logging your individual movements or home address.

Managing and Restricting Location Sharing on Your Devices

Users maintain full administrative control over location tracking across desktop and mobile platforms. You can easily revoke location permissions for individual applications through device privacy settings. Additionally, toggling off high-accuracy location services forces your phone to rely solely on basic network estimates.

+———————————————————————–+
|                      USER PRIVACY CONTROL STEPS                       |
+———————————————————————–+
  1. Open Device Settings -> Privacy & Security
  2. Select Location Services
  3. Choose Application (e.g., Maps, Browser, Social)
  4. Set Permission Level: “Never” | “Ask Next Time” | “While Using App”
  5. Toggle “Precise Location” OFF to share approximate city data only

For maximum privacy protection, many users deploy Virtual Private Networks (VPNs). A VPN reroutes your internet traffic through encrypted remote servers located in different cities or countries. Consequently, third-party websites see the VPN server address instead of your true internet provider location.

To read official technical documentation regarding browser location security standards, check the W3C Geolocation API Specification.

References

  • Poeker, L., & Zandbergen, P. A. (2015). Accuracy of IP Geolocation Databases. Cartography and Geographic Information Science, 42(3), 240-252.
  • World Wide Web Consortium. (2022). W3C Geolocation API Specification (2nd Edition). W3C Recommendation.
  • Zandbergen, P. A. (2009). Accuracy of iPhone Location Provisioning Using Cell Tower Triangulation, Wi-Fi Positioning, and A-GPS. Transactions in GIS, 13(s1), 5-25.


Calendar Infrastructure & System Time: How Web Applications Track What Day Is It?

Network time protocol server architecture showing device synchronization for tracking what day is it?

Every morning, millions of users turn on their laptops or smartphones and wonder, “What day is it?” We rely heavily on digital devices to show the correct date, manage calendar appointments, and schedule work tasks. However, maintaining an accurate date across millions of connected servers is a complex task. Digital systems constantly process time calculations behind the scenes to keep our global digital world operating smoothly.

How Digital Systems Track Dates and Calendar Standards

Computers do not store dates using traditional human calendar words like Monday or March. Instead, operating systems count seconds from a fixed reference point called Unix Epoch time, which began on January 1, 1970. The operating system continuously converts these raw seconds into human-readable calendar dates. Consequently, software applications can easily determine the exact day, month, and year for any location worldwide.

Furthermore, applications must automatically adjust for leap years, variations in month lengths, and daylight saving time shifts. For example, programmers write specific rules so that the calendar adds February 29 every four years. In addition, global web platforms accommodate different regional calendar standards, such as the Gregorian, Islamic, or Hebrew calendars, by translating central Unix time values into localized displays.

The Role of NTP Servers in Global Time Synchronization

To ensure every smartphone and server agrees when asking what day is it, networks rely on the Network Time Protocol (NTP). Atomic clocks around the world maintain ultra-precise time and send this signal to primary time servers. Thereafter, secondary NTP servers distribute this accurate time data across the internet to personal devices, preventing system clocks from drifting apart over time.

+———————————————————————–+
|                         ATOMIC CLOCKS                                 |
|               (Reference Time Source – Stratum 0)                     |
+———————————————————————–+
                                    |
                                    v
+———————————————————————–+
|                     PRIMARY NTP SERVERS                               |
|                     (Stratum 1 Servers)                               |
+———————————————————————–+
                                    |
                                    v
+———————————————————————–+
|              CLIENT DEVICES & WEB APPLICATIONS                         |
|         (Smartphones, Laptops, Web Browsers – Stratum 2+)             |
+———————————————————————–+

Fixing Out-of-Sync System Clocks and SSL Certificate Errors

When a device clock strays from the actual network time, users experience confusing software glitches. For instance, an incorrect system date often triggers severe SSL certificate errors in web browsers. Browsers compare the website certificate’s valid date range against the local computer clock. If your computer clock shows a date in the past or future, the browser blocks access for security reasons.

Fortunately, users can quickly troubleshoot out-of-sync system clocks on both Windows and macOS. You can resolve most date errors by navigating to system settings and toggling on the automatic time sync feature. Furthermore, manually clicking the “Sync Now” button forces your device to reconnect with official NTP servers, immediately restoring web access and fixing security warnings.

Setting Up Time-Zone Automation in Daily Workflows

Modern productivity tools offer powerful time-zone automation settings to prevent calendar confusion for remote teams. Applications like Google Calendar, Slack, and Microsoft Outlook can automatically detect your current location and update your schedule accordingly. As a result, team members working in different time zones always see accurate meeting times without manual calculation.

To streamline your daily workflow, enable automatic time zone detection on your operating system and calendar apps. Additionally, set secondary time zones inside your primary calendar view if you regularly collaborate with international colleagues. Proper calendar automation saves valuable time, eliminates scheduling conflicts, and ensures everyone knows exactly what day is it for global deadlines.

For technical guidelines on how web standards handle temporal formats, visit the W3C Date and Time Specification.

References

  • Mills, D. L. (2010). Computer Network Time Synchronization: The Network Time Protocol on Earth and in Space. CRC Press.
  • Tanenbaum, A. S., & Bos, H. (2014). Modern Operating Systems (4th ed.). Pearson.
  • Network Time Foundation. (2024). Network Time Protocol (NTP) Specification and Architecture. NTF Documentation.

What Is My IP? Everything You Need to Know About IP Addresses

 Network architecture diagram showing public and private routing to answer what is my IP?

Every computer, tablet, and smartphone connected to the internet relies on a special numeric label to send and receive information. When you type a query like “What is my IP?” into a search engine, you are asking for your device’s exact digital return address. Internet Protocol (IP) addresses allow millions of web pages, videos, and emails to reach the correct destination instantly. Without these unique numbers, global data traffic would stall because routers could not identify where to send incoming web information.

What Is My IP Address and How Does It Work?

An IP address works like a physical street address for your internet-connected devices. When you request a web page on your browser, your computer sends out data packets containing your unique network ID. The web server reads this identifier and sends the requested page back to your specific router. Therefore, every online interaction depends on this mutual exchange of network identifiers to maintain clear communication lines.

+———————————————————————–+
|                            YOUR DEVICE                                |
|             (Sends request: “Load website content”)                   |
+———————————————————————–+
                                    |
                                    v
+———————————————————————–+
|                           YOUR ROUTER                                 |
|            (Attaches Public IP Address to request)                    |
+———————————————————————–+
                                    |
                                    v
+———————————————————————–+
|                           WEB SERVER                                  |
|         (Reads Public IP and returns requested website data)          |
+———————————————————————–+

Understanding IPv4 Versus IPv6 Protocols

Engineers created the IPv4 format decades ago using four sets of numbers separated by decimals, such as 192.168.1.1. However, IPv4 only supports about 4.3 billion unique combinations. Because connected smart devices grew rapidly worldwide, the tech industry quickly ran out of available IPv4 numerical combinations for new users.

To solve this shortage, networking experts introduced the newer IPv6 format. IPv6 uses hexadecimal characters separated by colons, creating trillions of new unique network entries. As a result, modern networks use both protocols simultaneously to ensure uninterrupted growth across global internet platforms.

Public Versus Private IP Addresses

Your Internet Service Provider (ISP) assigns a public address directly to your home router. This single public number identifies your entire home network to every outside website on the open internet. Consequently, all connected devices in your household share this single public network identifier when browsing external web pages.

In contrast, your home router generates internal private numbers for each connected device, such as your laptop, smart phone, and TV. These private labels allow your local devices to communicate safely with each other without exposing internal home traffic directly to the outside web.

Dynamic Versus Static Routing Differences

Most residential internet subscribers receive dynamic addresses from their service providers. A dynamic address changes periodically whenever your router restarts or when the internet provider refreshes its connection pools. This automatic rotation helps internet service providers manage their available number pools efficiently across millions of residential customers.

On the other hand, businesses and web servers usually pay for static addresses. A static address remains permanently fixed to one network connection without changing. Companies use static connections so that remote employees, web hosting servers, and online databases maintain reliable, constant connections without unexpected address changes.

What Information Does an IP Address Reveal?

Many users worry about their online privacy when asking, “What is my IP?” Your network identifier reveals general geographical details, such as your current country, state, city, and local area postal code. It also displays the official name of your active Internet Service Provider to every website server you visit.

However, your network identifier does not reveal sensitive personal details like your full name, home street address, or phone number. Only your Internet Service Provider holds the official logs linking your network number directly to your personal customer billing account. Law enforcement agencies usually require legal court warrants to request these personal account details from providers.

How to Find Your IP Address Across Devices

Finding your internal private address requires simple system setting adjustments on your hardware. On Windows computers, open Command Prompt, type ipconfig, and press Enter to view your IPv4 details. On macOS devices, open System Settings, select Network, and click on your active Wi-Fi connection to inspect your local numbers.

+———————————————————————–+
|                    QUICK DEVICE LOOKUP STEPS                          |
+———————————————————————–+
  – Windows: Open Command Prompt -> Type “ipconfig” -> Press Enter
  – macOS: Open System Settings -> Click Network -> Select Active Wi-Fi
  – Android: Open Settings -> Select About Phone -> Tap Status Information
  – iOS: Open Settings -> Select Wi-Fi -> Tap “i” icon beside network

On mobile platforms, you can locate your private network status easily within your connection submenus. On Android phones, open Settings, select About Phone, and tap Status Information to view your local details. On iPhones, navigate to Settings, tap Wi-Fi, and select the small info icon next to your connected local network name.

Protecting Your Online Privacy: VPNs, Proxies, and Tor

If you want to hide your network location from websites, you can use specialized privacy tools. A Virtual Private Network (VPN) encrypts your data traffic and routes your request through an external server. Thus, external websites see the VPN server location instead of your real residential network address.

+———————————————————————–+
|                       PRIVACY TOOL COMPARISON                         |
+———————————————————————–+
| Tool Type | Encryption Level | Primary Function                       |
|———–|——————|—————————————-|
| VPN       | High (Full App)  | Encrypts all traffic & masks location  |
| Proxy     | Low (Browser)    | Re-routes simple browser requests only |
| Tor       | Maximum (Multi)  | Passes traffic through 3 encrypted nodes|
+———————————————————————–+

Alternatively, proxy servers act as simple middlemen for basic browser requests, though they often lack full system encryption. For maximum privacy, the open-source Tor network bounces your encrypted data across three random international server nodes. Using these security tools prevents third-party ad trackers from monitoring your browsing habits across different websites.

For more technical details on how networking protocols handle digital communications, read the official IETF Internet Protocol Specification.

References

  • Comer, D. E. (2018). Internetworking with TCP/IP Vol.1: Principles, Protocols, and Architecture (6th ed.). Pearson.
  • Kurose, J. F., & Ross, K. W. (2021). Computer Networking: A Top-Down Approach (8th ed.). Pearson.
  • Postel, J. (1981). Internet Protocol: DARPA Internet Program Protocol Specification (RFC 791). Information Sciences Institute.

 Causes of Honeycombing in Concrete: A Site Engineer Guide

A detailed illustration explaining the causes of honeycombing in concrete structures on a construction site.

Building durable structures requires careful work during every concrete pour. However, site crews often face serious surface defects after removing formwork. Understanding the primary causes of honeycombing in concrete helps site engineers prevent these structural weak spots.

Honeycombing describes hollow spaces, voids, or stony pockets left inside hardened concrete members. This defect occurs when coarse stone aggregates separate from the fine cement paste. Consequently, trapped air pockets remain inside the structural element instead of a solid mass.

These hollow voids do more than ruin the appearance of your building. They significantly reduce the load-bearing capacity of columns, beams, and slab edges. Furthermore, moisture and aggressive chemicals easily penetrate these open voids over time. This exposure rusts the internal steel rebar and leads to premature structural failure.

                  Anatomy of Concrete Honeycombing
                 
      ┌──────────────────────────────────────────────────┐
      │  Solid Hardened Concrete                         │
      │  [Fine Aggregate + Cement Paste + Coarse Stones] │
      ├──────────────────────────────────────────────────┤
      │  Honeycombed Area (Defective Zone)               │
      │  [Coarse Stones Only] ◄── (Slurry Leaked Out)   │
      │  ( Trapped Air Voids ) ◄── (Poor Vibration)      │
      └──────────────────────────────────────────────────┘

Leaky Formwork and Slurry Loss

Unsealed formwork joints represent one of the biggest causes of honeycombing in concrete. During concrete placement and vibration, wet concrete exerts immense pressure against side boards. If small gaps exist between timber or steel panels, liquid cement slurry quickly leaks out.

When the liquid cement paste escapes, only dry stone aggregates remain along the outer boundary. As a result, the coarse stones lock together without any binding paste to fill the spaces between them.

Site teams must seal every timber seam, corner, and bottom joint before pouring. You can easily use foam gaskets, heavy-duty tape, or silicone sealant to close gaps. Additionally, strong external bracing prevents formwork panels from pushing outward under heavy concrete pressure.

Poor Mix Workability and Incorrect Slump

Pouring stiff or overly dry concrete mix severely limits its ability to flow. A concrete mix with low workability cannot easily pass through tight rebar spaces or reach distant corners. Therefore, stiff mixes create large air pockets along the formwork face.

  • Low slump mix: Stiff concrete fails to self-consolidate inside narrow beam moulds or column forms.
  • Excessive water addition: Adding raw water on site weakens the concrete matrix and causes severe aggregate segregation.
  • Improper chemical dosing: Failing to add plasticizer admixtures reduces flowability in congested rebar areas.

Instead of adding excess water to increase flow, engineers should use superplasticizers. These chemical admixtures increase the concrete slump safely without reducing structural strength. Consequently, smooth cement paste flows effortlessly into every corner of the formwork.

Improper Concrete Vibration Techniques

Incorrect vibration techniques directly cause severe surface voids during placement. Internal poker vibrators force trapped air bubbles to rise and escape from wet concrete. However, inexperienced site workers frequently misuse vibration equipment during construction.

               Correct vs. Incorrect Vibration Method
             
        [ Correct: Vertical ]           [ Incorrect: Horizontal ]
                │                                   │
                ▼                                   ▼
        ┌─────────────────┐                 ┌─────────────────┐
        │  Deep, Vertical │                 │  Dragging Poker │
        │  Strokes with   │                 │  Horizontally   │
        │  Overlap        │                 │  Causes Stones  │
        │  (Dense Concrete)│                 │  To Segregate   │
        └─────────────────┘                 └─────────────────┘

Dragging a poker vibrator horizontally through wet concrete separates coarse stones from the liquid paste. This bad habit leaves heavy stone clusters in one area while dragging liquid paste away. Always insert the vibrator vertically at regular intervals. Hold it steady for a few seconds, then withdraw the poker slowly.

Rebar Congestion and Inadequate Clearance

Tight rebar spacing creates physical barriers that block large coarse stones from flowing freely. When steel bars sit too close together, coarse aggregates get trapped above the steel cage. This blocking action prevents concrete from filling the bottom cover zone.

Engineers must specify correct clear spacing between individual steel bars based on maximum aggregate size. Furthermore, workers must use concrete spacer blocks to maintain proper cover. Sufficient clearance allows coarse aggregates and mortar to flow smoothly around all steel bars. To read more about structural concrete design standards and site quality control, explore detailed guidelines on the American Concrete Institute platform.

References

  • American Concrete Institute. (2019). Building Code Requirements for Structural Concrete (ACI 318-19). ACI.
  • British Standards Institution. (1997). Structural use of concrete: Code of practice for design and construction (BS 8110-1:1997). BSI.
  • Neville, A. M. (2011). Properties of Concrete (5th ed.). Pearson Education.

 Safe Timing for Walking and Placing Loads on Newly Poured Slabs

A guide explaining the safe timing for walking and placing loads on newly poured slabs during site construction.

When you pour a fresh concrete floor, the hydration process begins immediately. Cement reacts chemically with water to form a strong, solid matrix. However, early-age concrete remains vulnerable to surface damage and deep cracking if you disturb it too soon. Structural engineers and site managers must understand the safe timing for walking and placing loads on newly poured slabs to avoid costly structural failures.

                  Early-Age Concrete Strength Timeline
                 
  0-24 Hours              24-48 Hours           3-7 Days            28 Days
  [ Hydration Starts ] ──► [ Foot Traffic ] ──► [ Light Loads ] ──► [ Full Load ]
  (No Movement)            (5-10 N/mm²)         (50-70% fck)        (100% fck)

Premature loading creates permanent plastic deformations and weakens the bond between the embedded steel rebars and the concrete matrix. Therefore, you must monitor compressive strength gains closely rather than guessing field readiness based on surface appearance alone.

Initial Walking Access on Fresh Concrete

Workers often ask when they can safely step onto a freshly cast floor. In most ambient conditions, you can allow light foot traffic within 24 to 48 hours after placement. At this stage, the concrete typically achieves a minimum compressive strength of 5 \text{N/mm}^2 to 10 \text{N/mm}^2.

Furthermore, hot weather speeds up hydration, while cold temperatures slow down setting times significantly. Therefore, you must check that the surface feels firm and displays no indentation marks before allowing foot traffic. Site workers should always wear soft-soled boots during this initial phase to protect the fresh finish from surface scuffs.

Light Construction Loads and Material Storage

Placing construction materials on a green slab requires careful timing and load distribution. You can generally begin placing light materials, such as formwork props or small equipment, between 3 and 7 days after pouring. At this point, the member reaches approximately 50% to 70% of its target 28-day characteristic strength (f_{ck}).

                     Proper Load Distribution Method
                   
            [ Heavy Pallet / Construction Material ]
                              │
                              ▼
            ─────────────────────────────────────  ◄ Wooden Bearers/Planks
            =====================================  ◄ Concrete Slab

To prevent high point stresses, you should always lay wide timber planks or pallets beneath heavy material stacks. Spreading the weight prevents localized punching shear and protects the fresh top surface from impact damage.

Heavy Structural Loads and Design Limits

You must restrict heavy structural loading until the concrete reaches its full design strength. Major point loads, dense masonry walls, and heavy dynamic machinery require the concrete to complete its standard 28-day curing cycle. Applying heavy weight too early forces the member to deflect excessively and causes wide tension cracks.

Construction StageTypical TimelineTarget Compressive StrengthPermitted Site Activity
Initial Access24 – 48 Hours5 – 10 \text{N/mm}^2Light foot traffic, site inspection
Light Loading3 – 7 Days50% – 70% f_{ck}Small equipment, distributed rebar bundles
Full Loading28 Days100% f_{ck}Heavy blockwork, prop removal, machinery

If your project requires faster construction cycles, you can use rapid-hardening Portland cement or high-early-strength admixtures. However, site engineers must verify field-cured concrete cubes using crush tests before approving heavy loading operations.

Curing and Backpropping for Safe Timing for Walking and Placing Loads on Newly Poured Slabs

Proper curing plays a crucial role in reaching early structural capacity safely. Continuous wet curing or applying chemical curing compounds during the first 7 days speeds up strength gain dramatically. Effective curing traps internal moisture, prevents rapid surface drying, and improves overall abrasion resistance.

                 Multi-Story Backpropping Load Path
               
            [ Upper Floor Pour ] ──► (Wet Concrete Load)
                      │
                      ▼
            [ Formwork & Props ]
                      │
                      ▼
            [ Middle Slab ]      ──► (Backpropped to share load)
                      │
                      ▼
            [ Lower Solid Slab ] ──► (Supports cumulative weight)

When building multi-story structures, upper floors often require support before lower slabs reach full maturity. In such cases, you must maintain backpropping systems across consecutive floors to redistribute load paths safely down to the foundation. You can read more detailed structural testing guidelines and load testing procedures on the Institution of Civil Engineers official platform.

References

  • British Standards Institution. (1997). Structural use of concrete: Code of practice for design and construction (BS 8110-1:1997). BSI.
  • European Committee for Standardization. (2004). Eurocode 2: Design of concrete structures – General rules and rules for buildings (EN 1992-1-1). CEN.
  • Neville, A. M. (2011). Properties of Concrete (5th ed.). Pearson Education.

On-Site Concrete Strength Testing Methods: Site Guide

A guide illustrating various On-Site Concrete Strength Testing Methods used by engineers to assess structural capacity.

Ensuring structural safety requires accurate quality control on every construction site. Consequently, engineers use various On-Site Concrete Strength Testing Methods to verify that hardened concrete meets design requirements. Fresh concrete transforms through hydration, but environmental conditions can alter its strength development. Therefore, testing the actual structure ensures safety before workers remove formwork or apply heavy construction loads.

Site engineers rely on both non-destructive and destructive testing techniques to evaluate structural elements. Each method provides distinct insights into surface hardness, internal density, or actual compressive capacity. By combining these tests, engineers gain a complete picture of the building’s structural health.

              Overview of Concrete Testing Methods
             
    ┌──────────────────────────────────────────────────┐
    │         Concrete Testing Classifications          │
    └────────────────────────┬─────────────────────────┘
                              │
        ┌────────────────────┴────────────────────┐
        ▼                                         ▼
┌──────────────────┐                      ┌──────────────────┐
│ Non-Destructive  │                      │   Destructive    │
├──────────────────┤                      ├──────────────────┤
│ • Rebound Hammer │                      │ • Cube Crushing  │
│ • UPV Testing    │                      │ • Core Drilling  │
│ • Maturity Sensor│                      │                  │
└──────────────────┘                      └──────────────────┘

Measuring Hardness with the Rebound Schmidt Hammer

The rebound hammer test offers a fast, non-destructive way to measure surface hardness. During the test, a spring-driven steel hammer hits the smooth concrete surface. The device measures how high the hammer rebounds after impact, giving a unitless rebound number.

Higher rebound numbers indicate a harder surface and higher compressive strength. However, surface carbonation, moisture levels, and coarse aggregate placement can alter the reading. Therefore, engineers use this tool primarily for quick relative strength comparisons across different slab areas rather than absolute strength measurement.

                    Rebound Hammer Mechanism
                   
      [ Spring-Loaded Plunger ] ──► (Impacts Concrete)
                                          │
                                          ▼
      [ Rebound Distance Measured ] ──► (Generates Rebound Number)

Assessing Density with Ultrasonic Pulse Velocity

Ultrasonic Pulse Velocity (UPV) provides a non-destructive way to evaluate internal concrete quality. This equipment transmits electro-acoustic pulse waves directly through the structural member. The system measures the precise speed at which these sound waves travel from the transmitter to the receiver.

Faster pulse speeds indicate dense, sound concrete with few internal defects. Conversely, slower pulse speeds signal internal voids, honeycombing, or hidden structural cracks. As a result, UPV testing helps site teams locate hidden structural weaknesses without damaging the element.

              Ultrasonic Pulse Velocity (UPV) Setup
             
    Transmitter                                      Receiver
  ┌───────────┐      Electro-Acoustic Pulse       ┌───────────┐
  │    (T)    ├──────────────────────────────────►│    (R)    │
  └─────┬─────┘    =======> Sound Waves =======>   └─────┬─────┘
        │                                               │
        └─────────────[ Solid Concrete Member ]─────────┘

Compressive Cube and Cylinder Testing

Compressive cube crushing remains the standard reference method for structural concrete compliance. Workers pour fresh wet concrete into standard steel moulds during site placement. After field curing alongside the main structure, laboratory technicians place these cubes inside a calibrated Compression Testing Machine (CTM).

               Standard 28-Day CTM Testing Cycle
             
  [ Field Moulding ] ──► [ Water Curing ] ──► [ CTM Crushing ]
  (Day 0)                (Days 1 to 28)       (At 7, 14, & 28 Days)

The CTM applies a steady compressive force until the concrete specimen fails completely. Technicians perform these crushing tests at 7, 14, and 28 days to plot strength development curves. Consequently, this test verifies if the delivered batch meets the design characteristic strength (f_{ck}).

Evaluating Structures with Concrete Core Drilling

When non-destructive test results yield inconclusive data, engineers turn to concrete core drilling. This semi-destructive technique uses a diamond-tipped core drill to extract physical cylindrical samples from the actual structure.

Workers transport these core samples to a certified laboratory for surface dressing and compression testing. Core drilling yields the most reliable measurement of actual in-situ concrete strength. However, because core extraction cuts through internal concrete, engineers must carefully choose drilling locations to avoid severing main reinforcement bars.

Tracking Hydration using the Maturity Method

Modern smart construction relies heavily on the maturity method for real-time monitoring. Technicians embed small wireless temperature sensors directly inside the fresh concrete element before pouring. These sensors record internal hydration temperatures continuously over several days.

                 Smart Maturity Sensor Workflow
               
  [ Embedded Sensor ] ──► [ Tracks Heat/Time ] ──► [ Estimates Strength ]
  (Inside Formwork)       (Hydration Curve)        (Real-Time App Data)

The system calculates a maturity index based on the combined effect of temperature and curing time. As a result, site engineers can estimate real-time strength development accurately without waiting for laboratory cube tests. This data allows contractors to strip formwork and apply construction loads safely. You can find additional technical specifications and testing standards on the American Society for Testing and Materials official portal.

References

  • American Society for Testing and Materials. (2020). Standard Test Method for Rebound Number of Hardened Concrete (ASTM C805/C805M). ASTM International.
  • British Standards Institution. (2019). Testing concrete in structures – Non-destructive testing – Determination of rebound number (BS EN 12504-2). BSI.
  • Neville, A. M. (2011). Properties of Concrete (5th ed.). Pearson Education.